Windows Defender Antivirus is a free Windows 10 build in antivirus feature from Microsoft. It protects you from the threats like viruses, malware, ransomware and spyware across apps, web and email. It comes with strong real-time protection feature. But in Windows 10, it doesn’t have an option to uninstall or disable Windows Defender Antivirus permanently unless you install a third-party antivirus. But you can do it via Windows Security, Registry and Group Policy.
If you’re planning to perform a specific task, you don’t need to disable Windows Defender Antivirus permanently. You only need to turn it off temporarily.
Disable Windows Defender Antivirus Temporarily:
You can temporarily disable Windows Defender Antivirus using your Windows 10 security app. To do that please follow all below steps.
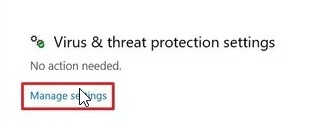
Click the Start menu button and select Windows Security from all program list. Then click Virus & threat protection option.

In that screen Under the Virus & threat protection settings section click the Manage settings option.
Then turn off the Real-time protection using below switch.
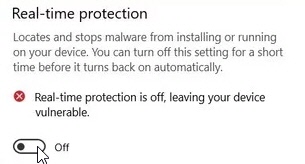
Using this option you can temporarily disable the real time protection of your Windows Defender Antivirus in Windows 10.
Disable Windows Defender Antivirus Permanently using Group Policy:
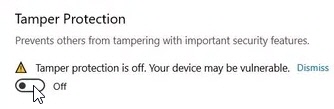
You can permanently disable Windows Defender Antivirus using your Windows 10 Group Policy editor. For that you need to disable tamper protection first. To disable tamper protection, click the Start menu button and select Windows Security from all program list. Then click Virus & threat protection option, after that click Manage settings under the Virus & threat protection settings. And finally Turn off the Tamper Protection.
Then in the windows search type gpedit.msc and then click the open on top gpedit.msc result. It will open the Local Group Policy Editor. Then navigate to
Computer Configuration->Administrative Templates->Windows Components->Windows Defender Antivirus
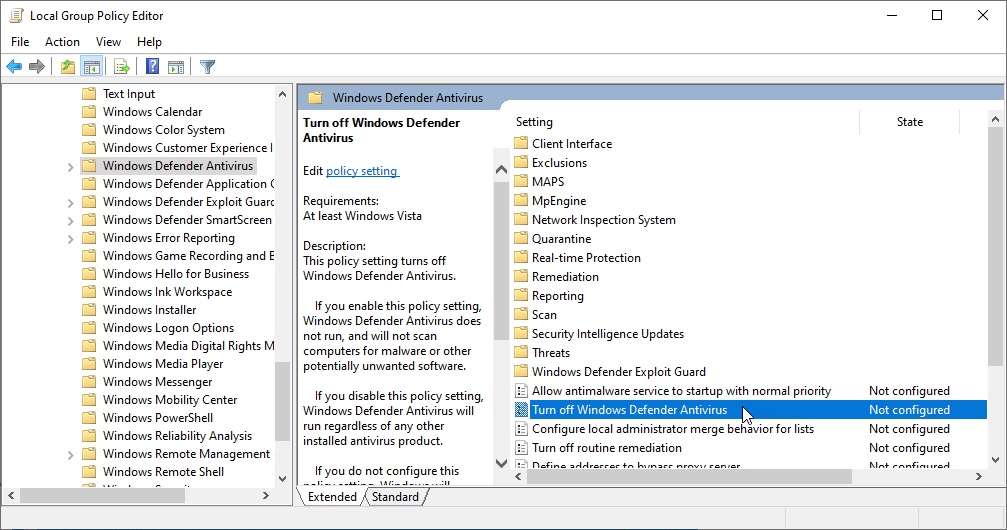
Then right click and select Edit option or Double click on the Turn off Windows Defender Antivirus policy option.

It will open the another windows. In that windows select Enabled option and click OK and restart your windows 10 system. This will permanently disabled the Windows Defender Antivirus on Windows 10.
Disable Windows Defender Antivirus Permanently using Registry:
First disable the Tamper protection using above method. Then open the Registry editor by searching regedit in windows search. Then go to below path in registry editor.
HKEY_LOCAL_MACHINE\SOFTWARE\Policies\Microsoft\Windows Defender
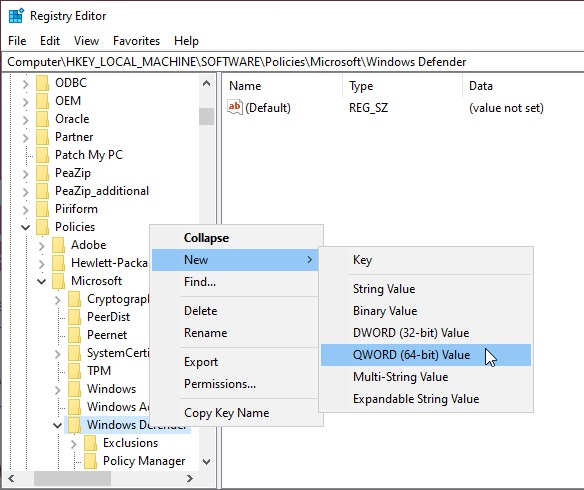
Right-click on the Windows Defender key, select option New, and click on DWORD (32-bit) Value and name the key DisableAntiSpyware and press Enter. After that Double click the newly created DWORD key and change the value from 0 to 1 to disable it . Then press OK and restart your system. That’s it.