Get Free SSL certificate for your Website
Let’s Encrypt is a certificate authority (CA) from non-profit Internet Security Research Group (ISRG) that provides free X.509 SSLl/TSL certificates via an easy automated process. It removes all complex process of manual creation, validation, signing, installation, and renewal of secure certificates. It is supported by all major browsers.
Note: This SSL certificates do not require a dedicated IP address or dedicated Hosting.
Note: To check your browser support click here.
Note: you only need dedicated ip, if you want to add very old browser support like IE6 on windows xp.
Note: Follow the same steps to renew your certificate also.
Free letsencrypt installation and setup steps on any shared hosting:
1.Install letsencrypt in your local system.
2.Get a certificate.
3.Install letsencrypt certificate on your domain.
1.Install letsencrypt in your local system.
Here we using ubuntu to install it locally. You can also follow this steps for any debian and Ubuntu based OS. It also work on Redhat based OS like fedora and more
For Ubuntu [Recommended method for 20.04 & Later] [Tested on Ubuntu 20.04]
The recommenced method of Let’s Encrypt certbot installation on Ubuntu 20.04 & later is installation via snap package manger. Ubuntu 19.10 & below users: you can also install it via snap. (but not tested by me).
In your terminal app run this command.
sudo snap install --beta --classic certbot
For other Linux Distro [Debian, Redhat, Ubuntu<=19.10 based OS ] [Tested on Fedora 32 & lower version of Ubuntu ]
Open your terminal app. In terminal type the below command and hit enter to execute it.
cd /usr/local
If you don’t have git in your system you can install it via below command.
For Debian & Ubuntu based OS, follow this command to install git.
sudo apt install git-all
If you are using Redhat , fedora based OS then install git via this command.
sudo dnf install git-all
Then execute the below command in terminal
sudo git clone https://github.com/certbot/certbot
This will download letsencrypt on your usr/local folder.
Then type and hit the below command to install it.
sudo ln -sf /usr/local/certbot/certbot-auto /usr/bin/certbot
To check the help menu, execute the below command
certbot --help
If you try above method on Ubuntu 20.04 and Later the you will get below error.
E: Package ‘python-virtualenv’ has no installation candidate
If you are using Ubuntu 20.04 and Ubuntu 20.04 based OS then install it via snap. Use below command to install
sudo snap install --beta --classic certbot
2. Get a SSL/TSL certificate with letsencrypt:
To create a new SSL certificate for the domain example.com and www.example.com, type the below code in terminal and hit enter.
Note: Replace example.com and www.example.com with your domain.
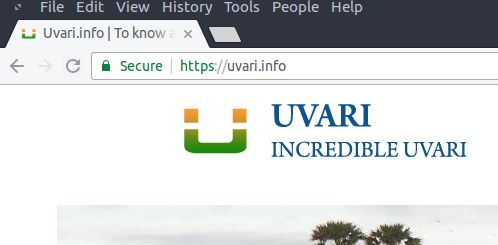
Example: Here i am using uvari.info for this tutorial.
certbot certonly --manual --email [email protected] -d example.com -d www.example.com
if your get any root or admin related error, like
The following error was encountered:
[Errno 13] Permission denied: ‘/var/log/letsencrypt/.certbot.lock’
Either run as root, or set –config-dir, –work-dir, and –logs-dir to writeable paths.
Then run above command as sudo user. [If you installed via snap then use sudo]
sudo certbot certonly --manual --email [email protected] -d example.com -d www.example.com
Example for my domain
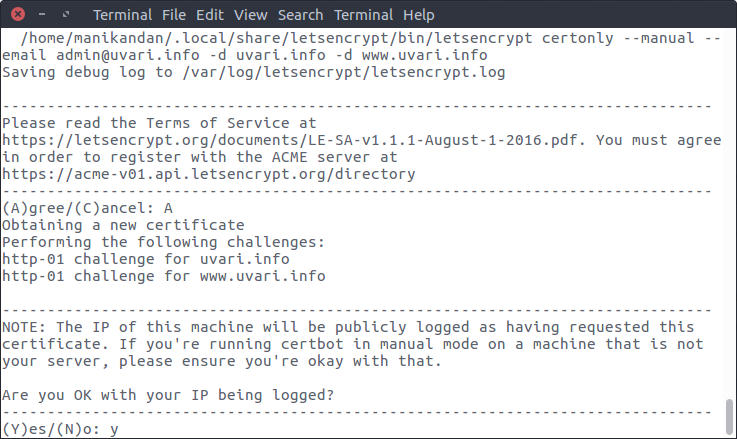
certbot certonly --manual --email [email protected] -d uvari.info -d www.uvari.info
or
sudo certbot certonly --manual --email [email protected] -d uvari.info -d www.uvari.info
It will ask you to agree some license agreements. Type A and Hit Enter for OK.
If you want to share your email address with them then type Y and hit the enter key.
It will also ask for IP logging. Type Y and hit enter key to confirm it.
Then it will give you a challenge to verify your ownership of the domains. Like below.

Example:
Make sure your web server displays the following content at http://uvari.info/.well-known/acme-challenge/hRiVw4n5HkMKjGOJ5sM1LH6aZ7PAikvQ50P5v5ol3HYHHH before continuing:

hRiVw4n5HkMKjGOJ5sM1LH6aZ7PAikvQ50P5v5ol3HYHHH.vBE2BdGTIzmo319dQAzEVl1HjPuYrr80O49aLOblk7M
Note: The above challenge looks little different for some version, but the below procedure is same for all.
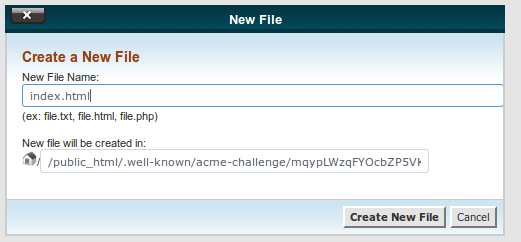
To solve the challenge, go to your domian root that is your public_html folder and create .well-known folder. Inside that .well-known folder create acme-challenge folder and then inside the acme-challenge folder create hRiVw4n5HkMKjGOJ5sM1LH6aZ7PAikvQ50P5v5ol3HYHHH folder.
Here this folder name is different for each user. Note yours and create according to yours. And inside that create a index.html file. Open that file and copy /paste the second content. That is hRiVw4n5HkMKjGOJ5sM1LH6aZ7PAikvQ50P5v5ol3HYHHH.vBE2BdGTIzmo319dQAzEVl1HjPuYrr80O49aLOblk7M for my case without any space. This content is also varies. Replace it with yours.
You will have to complete this challenge twice for each of the domains provided.
After you complete these two challenges you should get a success message like below screenshot.

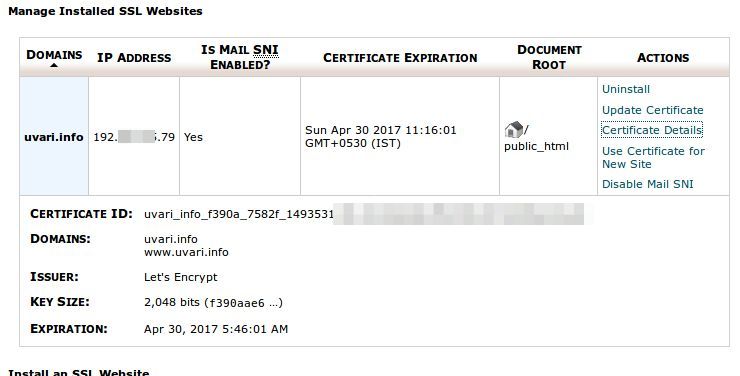
3.Install letsencrypt certificate on your domain.
After generating the certificate you need to install it on your domain. Here i am using cpanel control panel to manage my hosting. This procedure is not very different for other control panels.
The certificate is saved in /etc/letencrypt/live/example.com directory. Replace example.com with your domain name. You can see several files, but we need just the below 3 files.
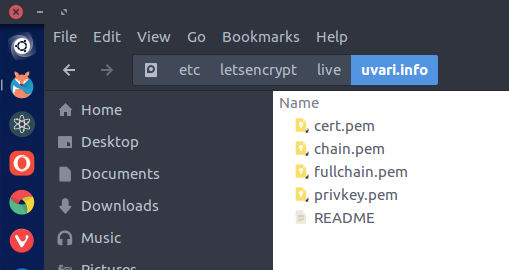
privkey.pem
cert.pem
chain.pem
Here privkey.pem is the private key, cert.pem is the ssl certificate and chain.pem is Certificate Authority Bundle (CABUNDLE).
In your terminal run the below code. it will open nautilus file browser as root.
gksudo nautilus
If above command failed then follow the below command.
[OR]
sudo -E nautilus
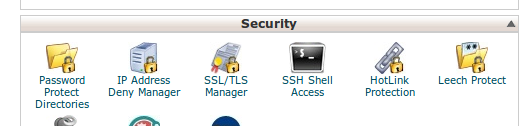
Now login to cpanel and look down for SSL/TSL manager. And open it.
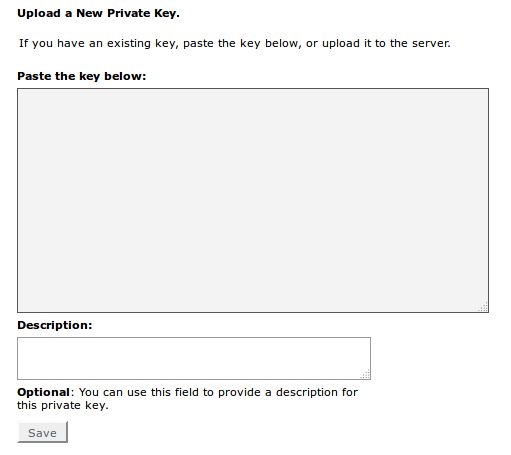
Click Generate, view, upload, or delete your private keys link. Now go back to the opened nautilus file browser as root and open the privkey.pem file with any text editor or gedit. Then copy all the contents from that file and paste it on “Paste the key below:” section and click the save button.
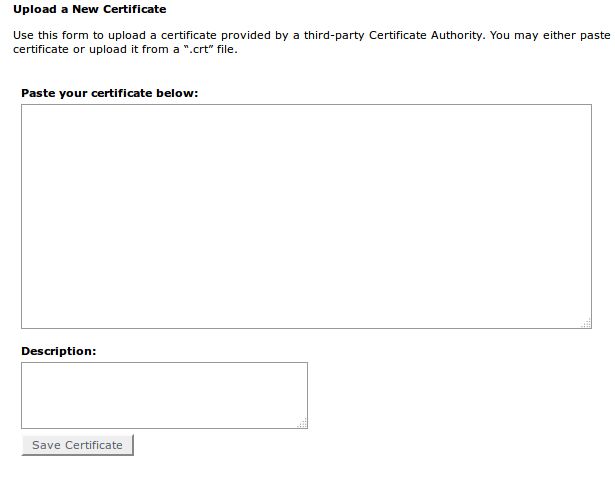
Now go to to ssl/tsl manager and click Generate, view, upload, or delete SSL certificates link.And open the cert.pem file with any text editor or gedit as root. Then copy all the contents from that file and paste it on “Paste your certificate below:” section and click the save certificate button.
Now again go to ssl/tsl manager and click Install and Manage SSL for your site (HTTPS) link. Select your domain from dropdown and Copy the cert.pem content to Certificate: (CRT) box, privkey.pem content to Private Key: (KEY) box and chain.pem content to Certificate Authority Bundle: (CABUNDLE) text box. And click the Install Certificate button.

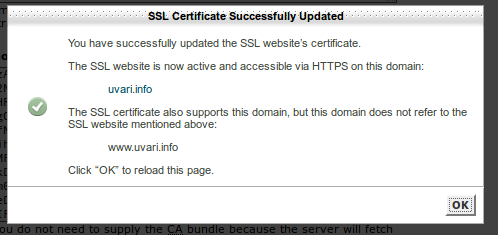
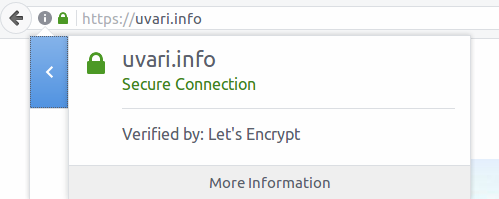
Thats it. Now go to https://example.com in your browser. Replace example.com with your domain.


can we install locally on windows OS? im not using any linux operation system
yes