According to microsoft User Account Control (UAC) is a feature in Windows that can help you stay in control of your computer by informing you when a program makes a change that requires administrator-level permission.
To Disable User Account Control (UAC) from the Windows: (here windows 7)
Method-1
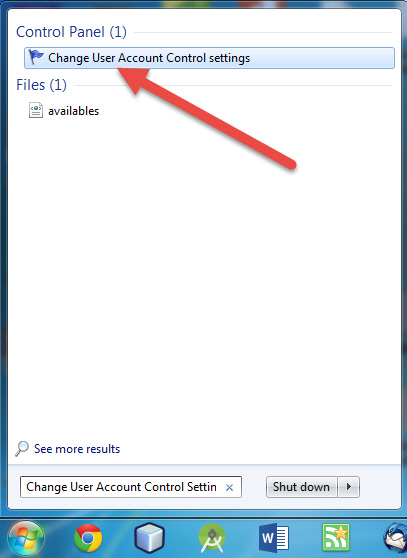
1.Open Change User Account Control Settings via the search Change User Account Control Settings in the start menu.
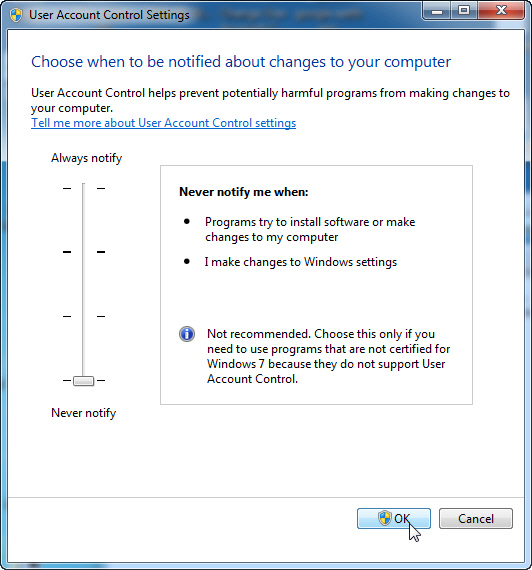
2.Change the User Account Control Settings slide to Never notify and click OK. And restart the pc.
Method-2
1.Open the Command Prompt.
[via the search cmd.exe in the start menu or via run (WIN+R) or via All Programs-> Accessories->Command Prompt.]
2.Enter the below command and press enter.
C:\Windows\System32\cmd.exe /k %windir%\System32\reg.exe ADD HKLM\SOFTWARE\Microsoft\Windows\CurrentVersion\Policies\System /v EnableLUA /t REG_DWORD /d 0 /f
3.Restart the pc.
To Enable User Account Control (UAC) from the Windows: (here windows 7)
Method-1
1.Open Change User Account Control Settings via the search Change User Account Control Settings in the start menu.
2.Change the User Account Control Settings slide to Always notify and click OK. And restart the pc.
Method-2
1.Open the Command Prompt.
[via the search cmd.exe in the start menu or via run (WIN+R) or via All Programs-> Accessories->Command Prompt.]
2.Enter the below command and press enter.
C:\Windows\System32\cmd.exe /k %windir%\System32\reg.exe ADD HKLM\SOFTWARE\Microsoft\Windows\CurrentVersion\Policies\System /v EnableLUA /t REG_DWORD /d 1 /f
3.Restart the pc.