How to remove Tiles from Windows 10 Start Menu

To remove tiles from Windows 10 Start Menu 1.Click the windows 10 start button. 2.Right click on the tile 3.select Unpin from start. Watch Video
To remove tiles from Windows 10 Start Menu 1.Click the windows 10 start button. 2.Right click on the tile 3.select Unpin from start. Watch Video
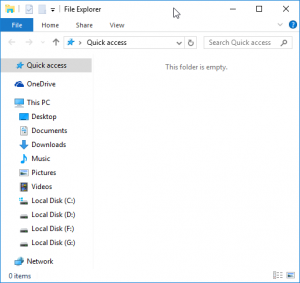
To remove 4 default folders Desktop, Downloads, Documents and Pictures from Quick access in windows 10. 1.Open File explorer from Task bar or from start menu. It will open the quick access menu. 2.Right click on Desktop folder and select…
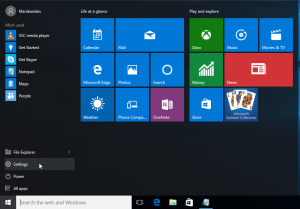
To enable full start screen in windows 10 1.Click the start button and select settings. 2.Select Personalization. 3.And then select Start from side menu 4.Click the Use Start full screen to On full Start Screen. 5.To check the now click…

Developer mode in windows 10 allows the developers to install apps from outside of the Windows store. To enable developer Mode in Windows 10 1.Click the Windows Start button and select settings menu. 2.Click Update & security. 3.Select For developers…


Softwares used
Windows 10 Technical Preview (32bit build 9926 EN-US)
Virtualbox 4.3.22
Windows 7
System requirements:
Processor: 1 gigahertz (GHz) or faster
RAM: 1 gigabyte (GB) (32-bit) or 2 GB (64-bit)
Free hard disk space: 16 GB
Graphics card: Microsoft DirectX 9 graphics device with WDDM driver
A Microsoft account and Internet access
(more…)
If your icons are not displaying correctly or your icon cache is corrupted like the below image, just rebuild the the Icon Cache.
To rebuild the the Icon Cache or fix this broken Start Menu ans Taskbar icons in Windows:
1.Open the Windows Explorer
2.Go to
%userprofile%\AppData\Local
and delete IconCache.db.
(more…)
According to microsoft User Account Control (UAC) is a feature in Windows that can help you stay in control of your computer by informing you when a program makes a change that requires administrator-level permission.
To Disable User Account Control (UAC) from the Windows: (here windows 7)
Method-1
1.Open Change User Account Control Settings via the search Change User Account Control Settings in the start menu.

To get Motherboard Model Number on Windows computer via command prompt follow these steps. 1.Open the Command Prompt. You can access it by searching for "cmd.exe" in the Start menu search box. Alternatively, press WIN+R to open the Run dialog,…
Softwares used:
Firefox 34.0.5
Windows 7
To install Firefox OS on windows
1.Open firefox browser.click the firefox Menu and Select Developer.